
How to photograph a used car on the lot, without a photo studio
On a busy lot, stop chasing a clean background and get the car right instead. Clearcoat replaces everything around the car with the same Showroom and keeps the car you photographed, with nothing on it redrawn.
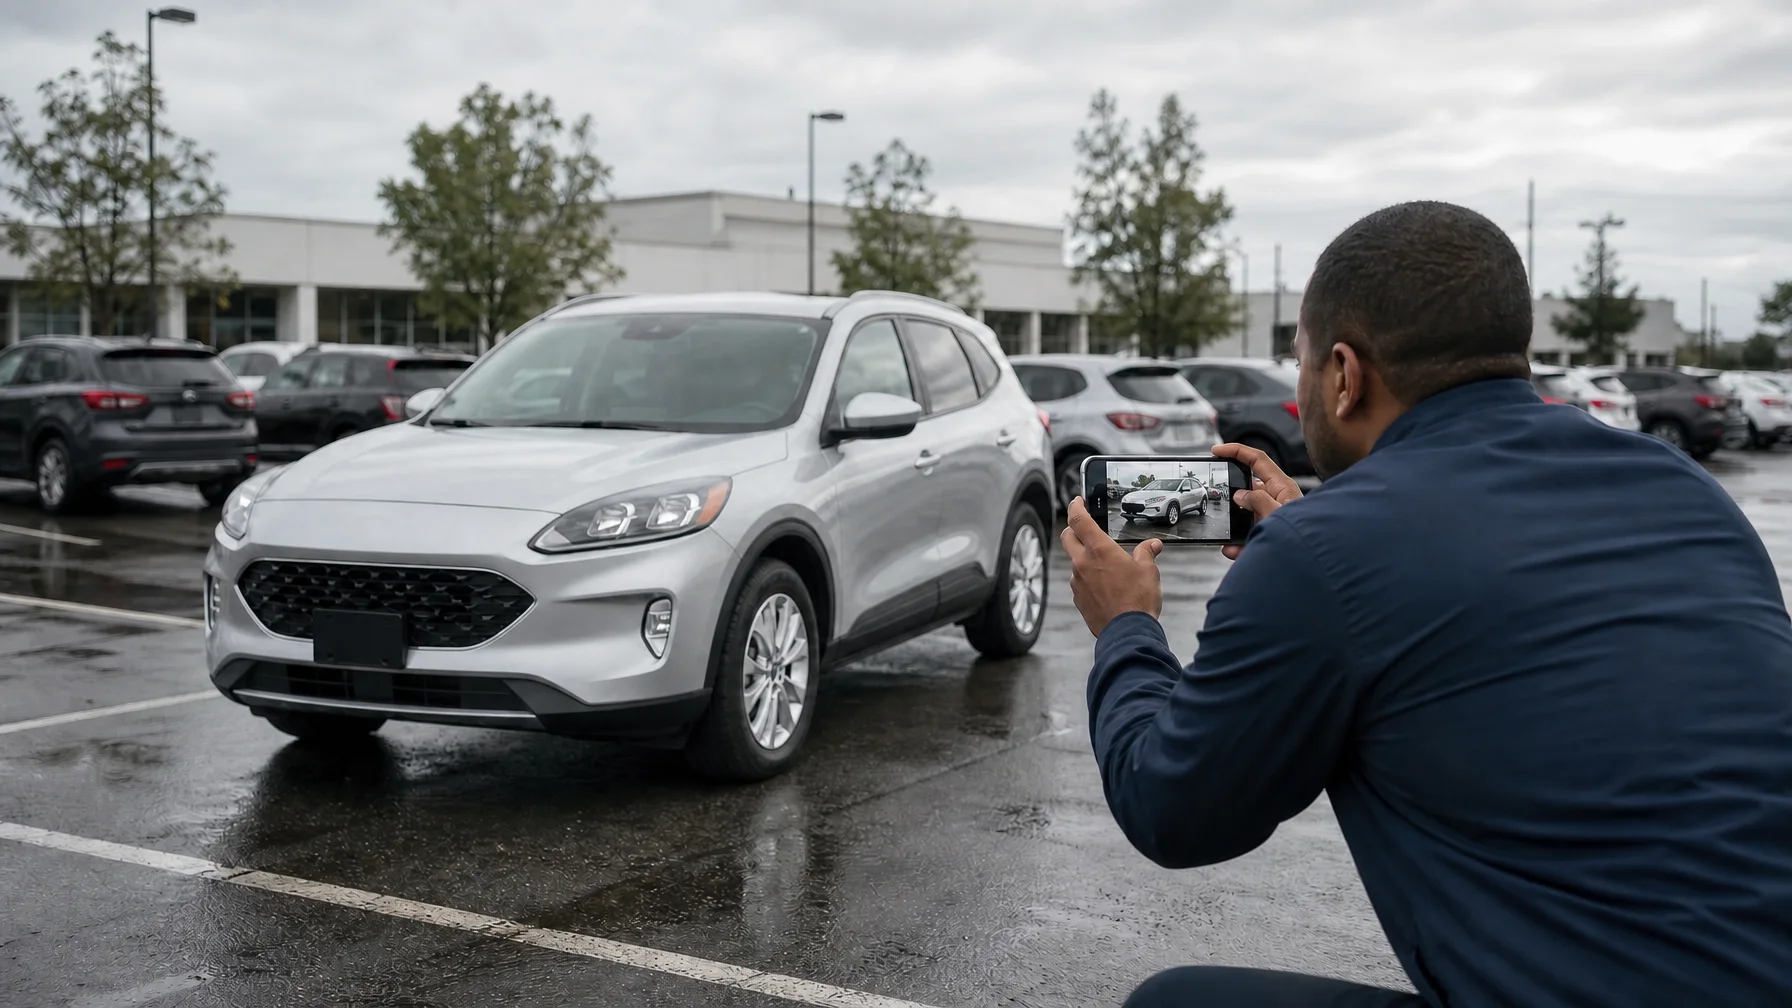
On a busy lot, stop trying to control the background and control the car instead. Photograph it where it is parked, and spend your minutes on five things: a clean, dry car; nothing standing between you and it; light that does not mirror the lot in the paint and glass; the same camera height on every car; and the whole car in frame, filling it. Those are the only things the photographer has to get right with Clearcoat, because Clearcoat replaces everything around the car with a Showroom afterwards and keeps the car itself from your photo. The usual advice asks for the opposite. Autotrader UK tells dealers to "take photos in a consistent location with minimal background distractions" (Autotrader UK dealer guidance, 2023), and AutoTrader.ca recommends "using the same backdrop for all vehicles" (AutoTrader.ca, 2022). On a working lot that means moving every car to the same wall. With Clearcoat, the Showroom is the consistent location, and the car can stay in its row.
The ordinary lot photo below, with overcast light, other cars, a shopping center and parking lines behind the car, became the Showroom photo after it.
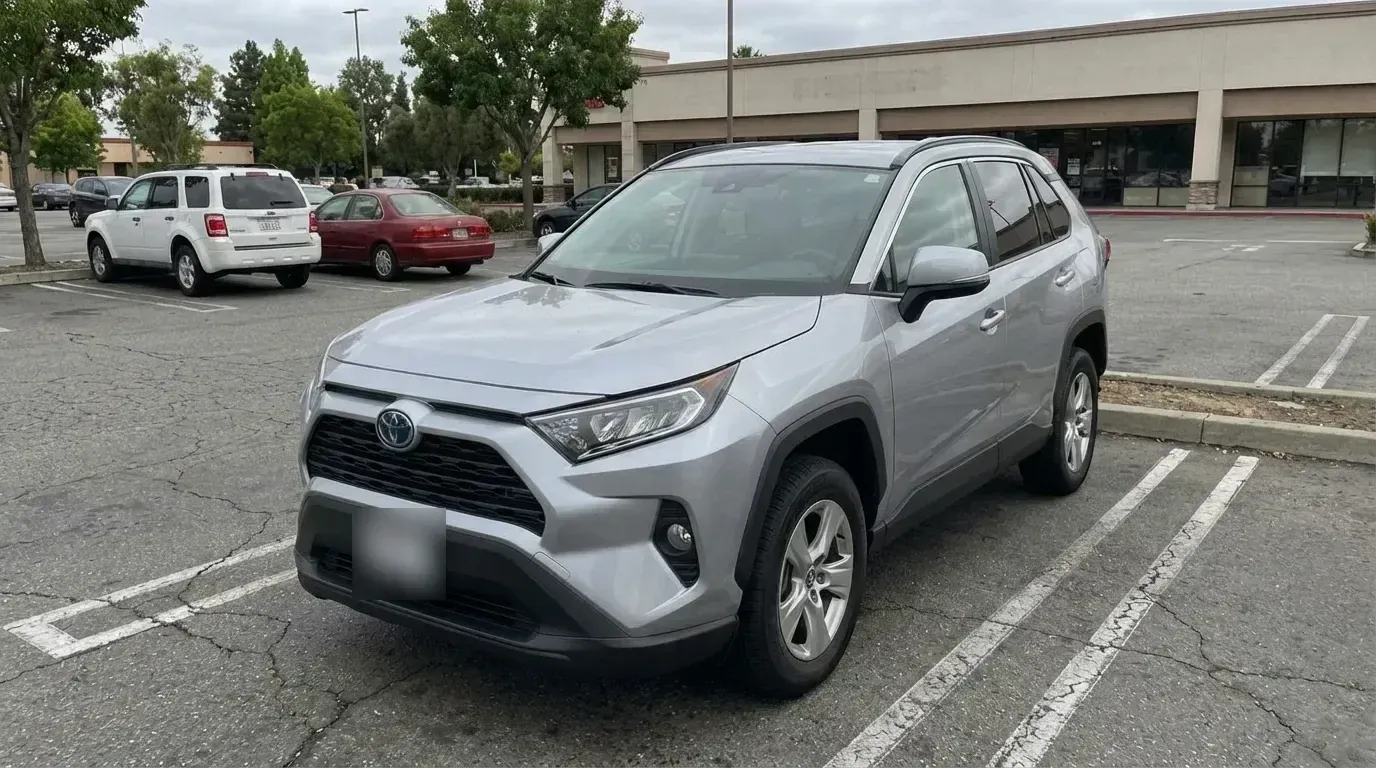
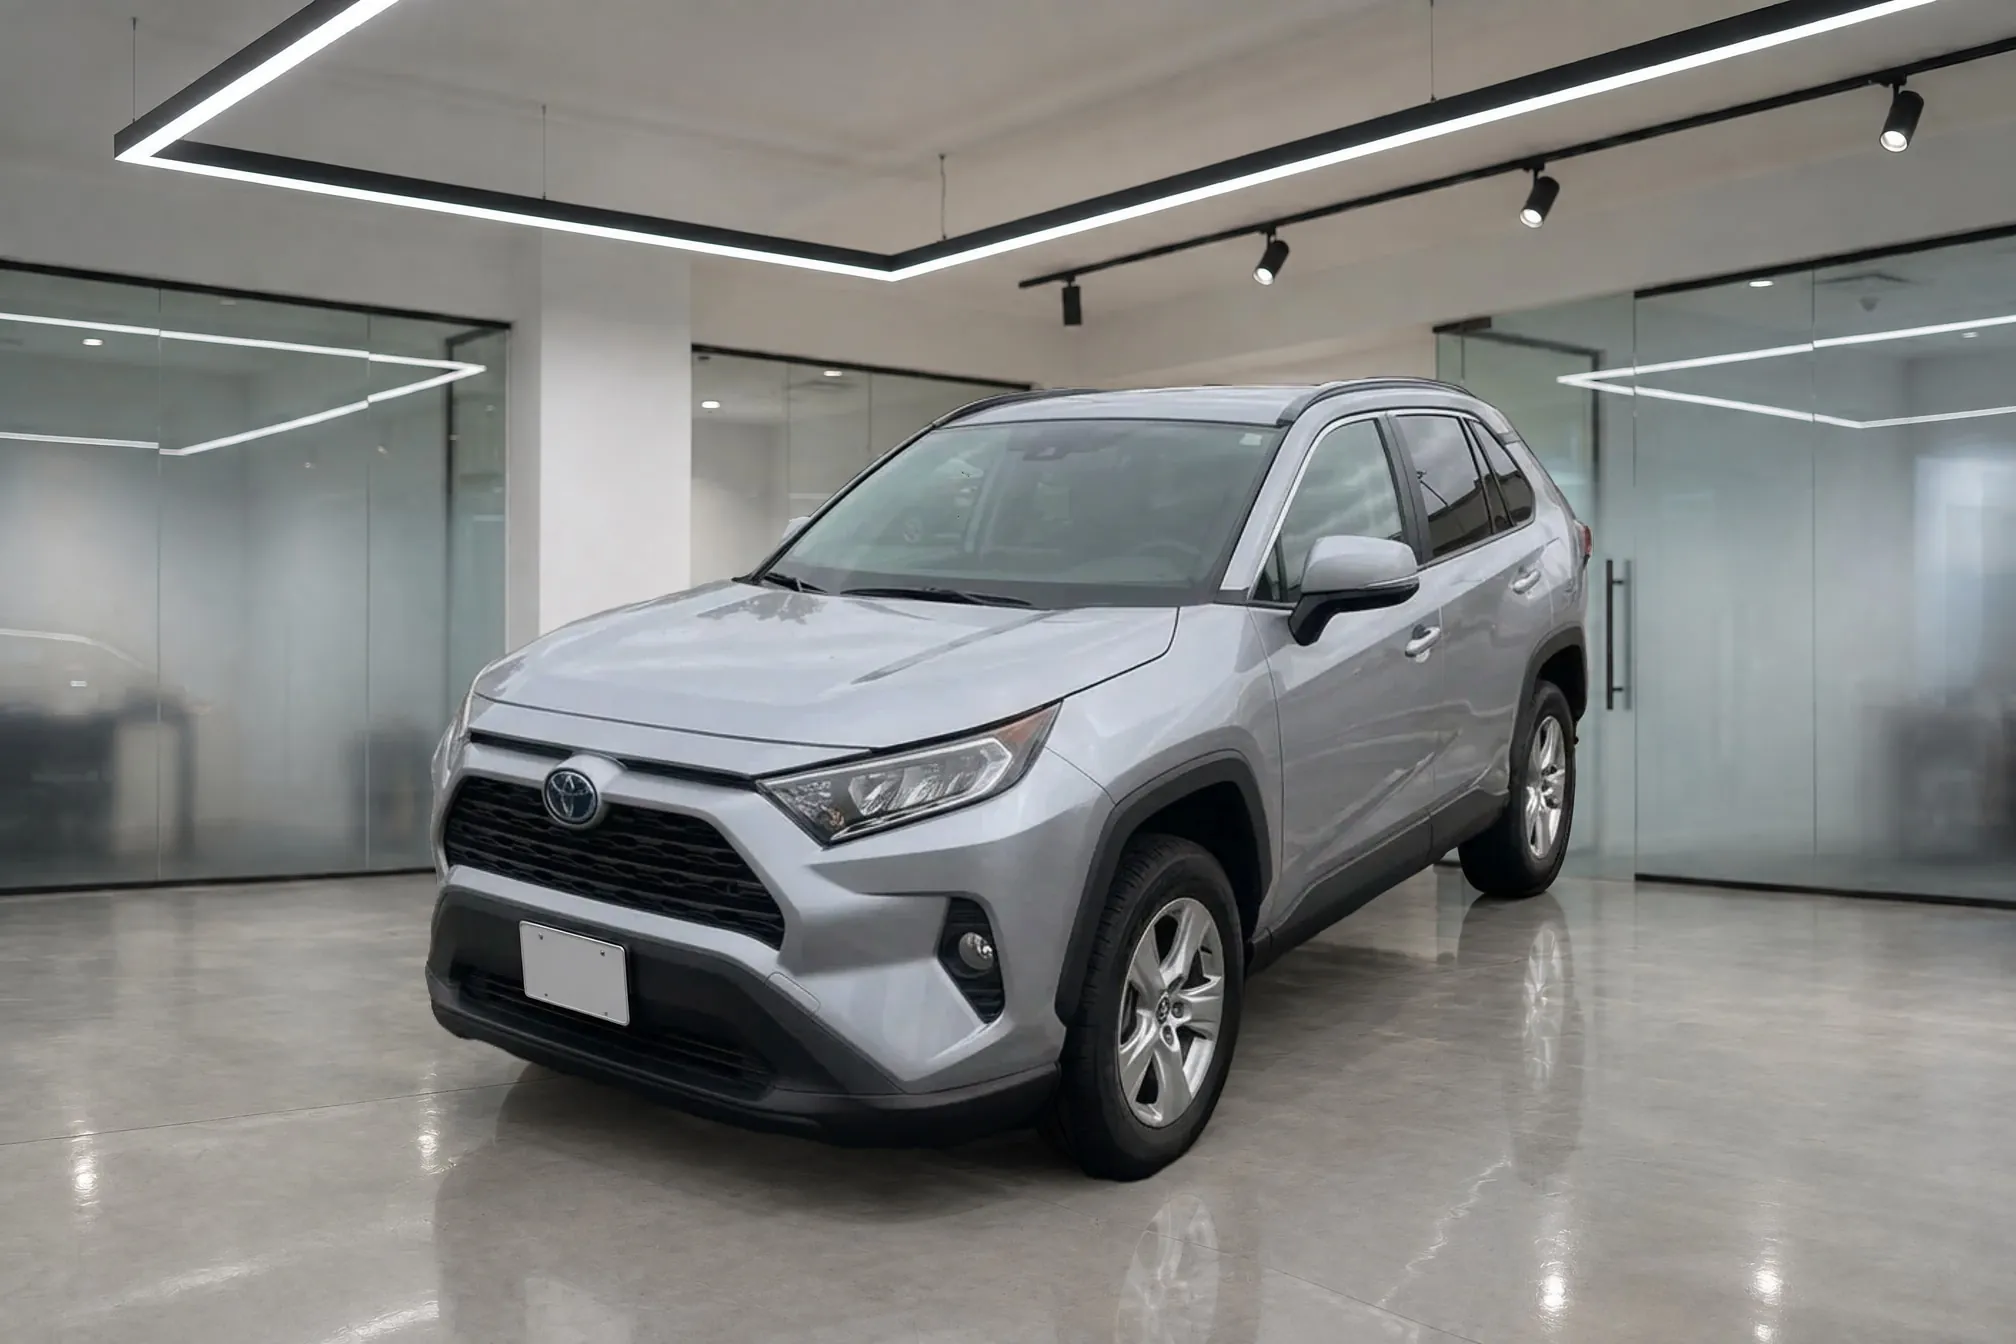
The plate is obscured in this published copy of the lot photo. The clean blank plate in the Showroom version is Clearcoat's default Hide setting.
What changes when Clearcoat replaces the background?
Clearcoat cuts the real car out of your photo, stands it on the Showroom floor, adds the room's floor shadow, reflection and soft light, then pastes the original car pixels back. Nothing on the car is redrawn. If the image model moves or redraws the car, that result is rejected and never delivered. So Clearcoat handles everything around the car, and on the car it adds only the room's light. Paint, glass, badges, wheels and wear come from your photo, and so do the angle and height you shot from.
That is what makes the finished photo trustworthy: the car in the listing is the car on the lot, not a version of it an image model drew. It is also why capture still matters. Dirt, water spots, a building mirrored in a door, your own shadow on the bumper or a mirror cut off by the edge of the frame are all part of the car's pixels, so they arrive in the listing too. Clearcoat does not hide damage, fix paint or swap wheels. A scratch you photograph is a scratch the buyer sees, which is how it should be.
Here is how the job divides:
| Still yours: it is part of the car's pixels | Handled by Clearcoat |
|---|---|
| A clean, dry car with nothing hanging in the windows | Whatever was behind the car |
| Reflections in the paint and glass: sky, buildings, other cars, you | The floor, the contact shadow and the floor reflection |
| Your shadow and hard shadows from poles or trees on the car | Where the car sits in the frame and how big it is |
| The whole car in frame, nothing between you and it | Cars, people and clutter behind the car |
| One camera height and angle, every car | The final format: 3:2, 4:3, 16:9 or 1:1 |
| Damage and wear, which stay | The plate, hidden by default or kept |
Every step below is about the left column.
How to prepare a used car for lot photos
Clean and dry the car before anything else. Autotrader UK's dealer guidance says it plainly: "Ensure the vehicle is clean and dry." Water droplets and spots count as much as dirt, because they are on the car and stay in the photo.
Then clear everything a buyer would see through the glass or on the body:
- Paperwork on the dash, hanging tags and anything on the seats. AutoTrader.ca asks dealers to remove "all personal items from the vehicle".
- Stock or price stickers on the windows, if your dealership's policy allows.
- Doors, trunk and fuel door closed.
- Wheels straight, or turned slightly for the front three-quarter.
Leave the background alone. There is no need to move the car to a clean wall or wait for the lot behind it to empty.
Where to stand on a busy lot
The lot behind the car can stay exactly as it is. Clearcoat cuts away the cars, people and building behind the one you are listing, even where they touch its outline in the photo. What matters is the space between you and the car.
- Nothing in front of the car. A person, a pole, a shopping cart or another car's bumper that crosses the car hides part of it. That part of the car is not in your photo, so there is nothing of it for Clearcoat to keep. Take a step to the side until the line of sight is clear.
- Your car is the biggest car in the frame. Clearcoat treats the largest car in the photo as the one you are listing. Half of a neighbor's car close to the lens can be larger in the frame than your car further away, so frame it out or move so your car clearly dominates.
- Room to step back. You need enough space to fit the whole car at the main lens. On a tight row, the car parked alongside stands between you and a side profile, so that may be the one angle that needs a car moved.
That is the practical difference: each angle needs a clear line of sight, not a clear lot.
What light works on a car lot?
Overcast days and open shade are the easy case. In sun, keep it behind you, keep your shadow off the car, and turn the car or shift a step until the doors, hood, windshield and side glass are not mirroring the sky, the building or the cars around it. This matches the marketplaces' own advice: Autotrader UK says "avoid dark shadows, bright reflections or overly bright light", AutoTrader.ca notes that "having the sun behind you will limit the amount of glare" while warning to "make sure your shadow isn't visible", and CarGurus warns that "the direct sunlight you get at noon on a clear day is not your friend" (CarGurus).
With Clearcoat, reflections deserve more of your attention than background clutter. The lot's light itself does not reach the listing, because the Showroom supplies the room's light. What the lot's light has put on the car does. Clearcoat's light step is a soft, broad change in brightness and color across areas of a panel, limited in how far it can brighten or darken them. It can make a panel sit naturally in the room's light. It cannot remove anything with a sharp edge, such as a building mirrored in a door, the hard shadow of a lamp post or a hot spot of sun on the hood. A patch of paint blown out to pure white holds no detail for any light to bring back. Your shadow on the ground goes with the background; your shadow on the car stays.
Glass works the same way, because the windows are part of the car. In the real before and after below, the canopy over the lot is mirrored in the windshield, and the same reflection is there in the Showroom photo.
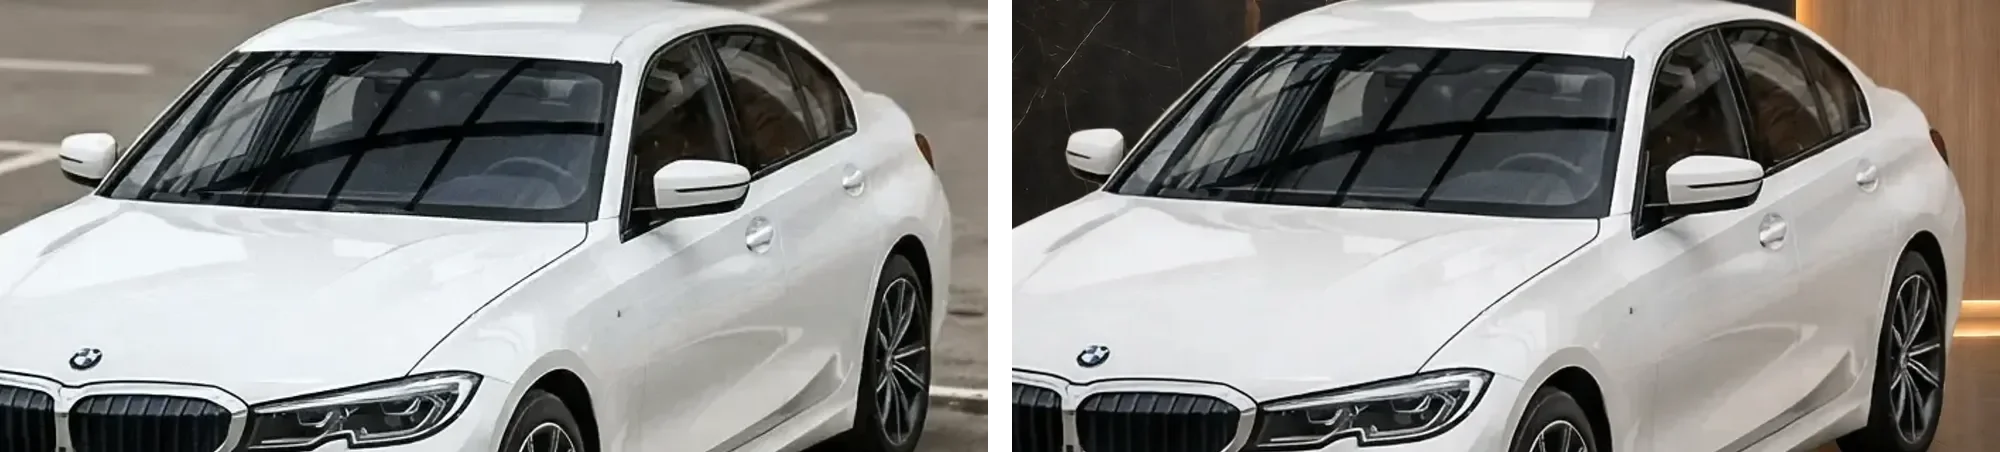
Whatever the glass mirrors on the lot, it mirrors in the Showroom too. A bright sky, a sign or your own figure in the glass will be in the finished photo, so check the windshield and side windows as closely as the paint before you press the shutter.
How high to hold the camera, and which lens
Pick one height and use it for every car: roughly headlight to mid-body, knees slightly bent. AutoTrader.ca puts it as "capture the vehicle from midway height, behind slightly at the knees. Don't tower over the car and avoid shooting from a low stance." Autotrader UK asks dealers to "always keep the camera at the same height when shooting images".
Clearcoat gives you one more reason to follow that. It moves and resizes the car to stand it on the Showroom floor, but it does not change the viewpoint the car was photographed from. A Showroom is a room seen from an ordinary, level height, so a car shot from well above or from ground level keeps that viewpoint inside a room that was not seen that way. One moderate height on every car also means a row of listings in the same Showroom reads as one set.
Use the phone's main 1x camera, not the 0.5x ultra-wide. As B&H notes, wide-angle lenses "when used up close to the car, will produce unwanted distortion" (B&H Explora). If the car does not fit, step back rather than widen.
How to frame the car
Get the whole car in frame with a small margin all around, and let it fill most of the frame. Clearcoat keeps only what your photo holds of the car, so a mirror, bumper or roofline cut off by the edge of the frame is not in the photo to keep.
Filling the frame matters because every car is resized to the same place in the Showroom photo. A car that is large in your photo keeps its detail when it is placed. A car that is small in your photo is enlarged to the same size as all the others, and looks softer next to them.
Landscape is the better habit, as Autotrader UK recommends: it gives a car more pixels, especially a side profile. A portrait photo is not wasted, though. You choose the finished format in the Studio afterwards (3:2, 4:3, 16:9 or 1:1), and Clearcoat centers the car in whichever you pick, so there is no need to compose for it at capture.
Shoot the exterior angles you plan to list, from the same height and distance on each car. The front three-quarter is the usual first photo.
Turning a walk-around into listing photos with Clearcoat
Upload the exterior photos of one car to one Vehicle, which holds up to 24 photos. In the Studio, choose the Showroom, the aspect ratio and the plate setting, and generate. Each photo becomes one finished photo of the car in that Showroom, from the same angle you shot it, in about a minute.
There is no need to cover the plate on the lot. Hide, the default, leaves the plate clean and blank; Keep leaves it as you photographed it.
Only whole-car exterior photos belong in the Vehicle. A Showroom is built for a whole car standing on its floor, so interior, dashboard, engine bay and close-up detail shots go on the listing as you took them. The Studio selects every photo in a Vehicle by default, so add only the exterior shots, or deselect the others before you generate.
One Credit is one finished photo, and a failed or canceled photo returns its Credit. A photo where Clearcoat cannot find a car fails at once. Clearcoat does not review your photos before generating, though, so a photo that contains a car but was badly lit or clipped is still turned into a finished photo and spends its Credit like any other. The routine is how you avoid paying for photos you will not list. To try it on one car, you can start with free credits, no credit card required.
How to keep every car's photos consistent
Choose the same Showroom for every car. Every listing then shares one backdrop, whether the car was parked by the entrance or at the back of the lot, and Clearcoat places every car in the same position in the frame. That meets the "consistent location" and "same backdrop" advice from the marketplaces without a physical location at all. The routine supplies the rest: the same height and the same angles on every car, which Clearcoat keeps rather than changes.
If you want the inventory to look like your own dealership, Clearcoat can make a Showroom from a photo of your own space, and the whole team can use it for every car.
A lot photo routine anyone on the team can repeat
- Wash or wipe the car, and dry it.
- Clear the dash, seats and windows of paperwork, tags and personal items.
- Close the doors, trunk and fuel door, and set the wheels.
- Leave the background as it is. Find a clear line of sight and room to step back.
- Shoot in overcast light or open shade. In sun, keep it behind you and your shadow off the car.
- Check the paint and glass for mirrored sky, buildings and cars. Shift a step or turn the car until the sides are quiet.
- Use the main 1x camera, in landscape, at the same height every time: headlight to mid-body, knees slightly bent.
- Frame the whole car with a small margin, nothing in front of it, and make sure it is the biggest car in the frame.
- Walk the exterior angles you list, starting with the front three-quarter.
- Upload the exterior photos to one Vehicle, choose your usual Showroom, and generate.
- Photograph the interior and details, and list them as taken.